Perfectly browned brined chicken breasts that cut like butter can feel like a magic trick, yet it really comes down to one straightforward kitchen move.
Home cooks keep chasing the same goal: golden on the outside, juicy inside, no pink, and no stringy dryness. A quiet technique borrowed from restaurant kitchens is now spreading quickly on social media because it delivers that result with almost no special gear.
Why brining changes everything for chicken breasts
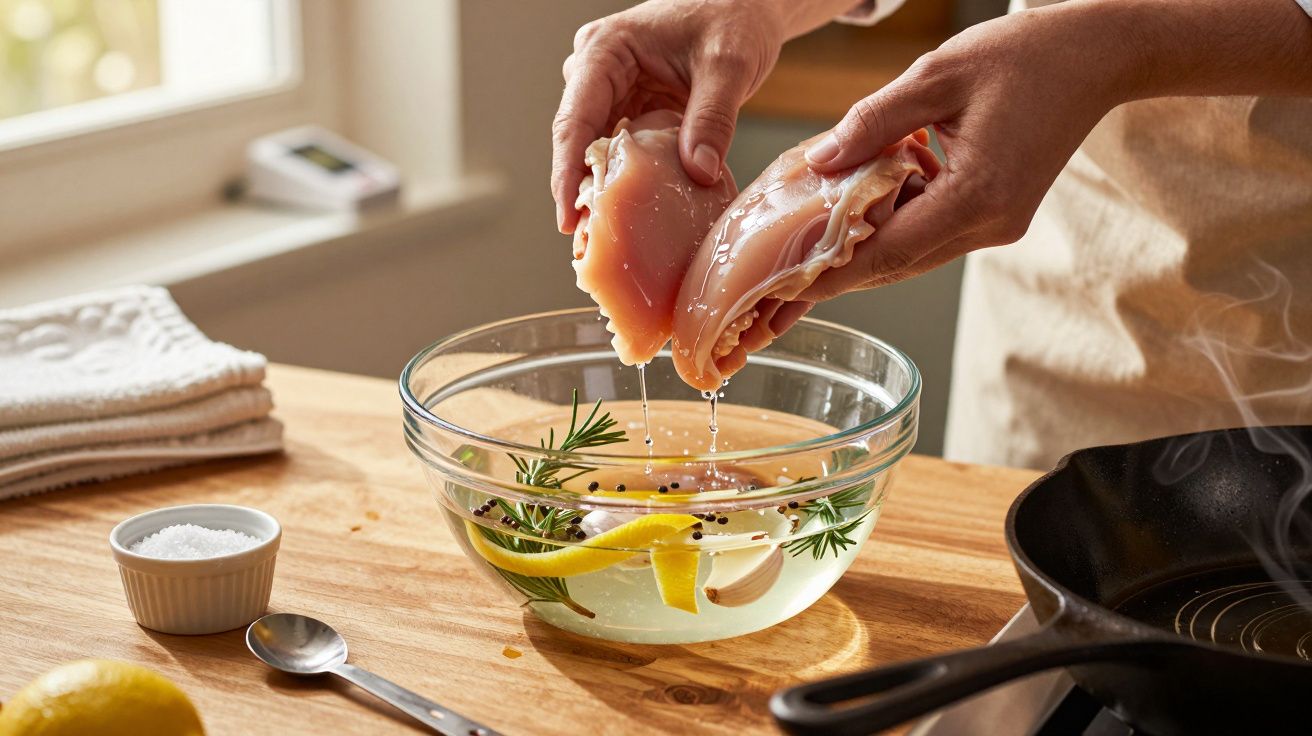
At the centre of this approach is brining-the simple step of soaking chicken in salty water before cooking. It sounds almost too basic, but it changes how the meat behaves in the pan and in the oven.
When salt meets raw meat, it begins loosening the protein structure. That gentle shift helps muscle fibres hold onto more water and flavour. Rather than squeezing out moisture as they heat, the fibres stay more relaxed and keep it in.
Brined chicken breasts keep more juice during cooking, which means less dryness, more tenderness and deeper flavour in every slice.
This gives home cooks a little breathing room. Even if the chicken stays on the heat a minute or two longer than intended, it usually stays pleasant instead of turning chalky.
How to make a simple, reliable chicken brine
You don’t need restaurant tools or specialised ingredients. A bowl, water, and salt get you almost all the way there.
The basic formula
- Water: 1 litre (about 4 cups)
- Salt: 60 g (about 3–4 tablespoons of fine salt or kosher salt)
Stir until the salt dissolves completely. It should taste clearly salty but not harsh. This strength hits a useful middle ground: strong enough to work quickly, gentle enough for everyday use.
Step-by-step brining routine
- Submerge the chicken: Put boneless breasts in a non-reactive container and cover fully with cooled brine.
- Chill: Cover and refrigerate. For chicken breasts, target 30 minutes to 2 hours.
- Do not overdo it: A long brine can make the meat overly salty and slightly spongy.
- Rinse: After brining, briefly rinse under cold water to remove surface salt.
- Dry well: Pat thoroughly dry with paper towels. A dry surface browns better and splatters less.
| Cut | Brine time | Notes |
|---|---|---|
| Chicken breasts (boneless) | 30–120 minutes | Thin fillets sit closer to 30–45 minutes |
| Chicken thighs (boneless) | 1–3 hours | Higher fat content gives more flexibility |
| Small pork chops | 1–4 hours | Helps against drying on high heat |
| Turkey breast | 4–12 hours | Useful for holiday roasts |
Layering flavour in the brine
After the salt dissolves, you can build a flavour profile around it. Think of the brine as a base layer that supports what you add later.
- Fresh herbs: thyme, rosemary, sage or flat-leaf parsley
- Aromatics: crushed garlic cloves, sliced onion, bay leaves
- Warm spices: black peppercorns, paprika, coriander seeds
- Citrus: lemon or orange slices for brightness
- A touch of sweetness: a spoonful of honey or sugar to round out the taste
Flavoured brines act like an early marinade, pushing subtle aromas into the meat before you even start cooking.
A practical note: if you use pre-salted products (like some supermarket “enhanced” chicken), check the label-those packs may already contain added sodium. In that case, shorten the brine or reduce salt to avoid pushing the seasoning too far.
For extra control, many cooks borrow a habit from food-safety guidance used by third parties such as the USDA: keep poultry cold during brining, and use a dedicated container that can be cleaned easily. If you want more precision, a digital thermometer from brands like ThermoWorks helps you hit 74°C (165°F) without guesswork.
Cooking methods that keep brined chicken juicy
Once the brine has done its work, the cooking method determines the final texture. Chicken breasts respond fast to heat, so control matters more than any fancy trick.
Pan-seared chicken breasts
For many home cooks, a hot pan remains the quickest route to dinner. With brined meat, you get better browning and a bit more margin for error.
- Heat a heavy pan over medium to medium-high with a mix of oil and a little butter.
- Add the dried chicken breasts and let them brown without moving for 3–4 minutes.
- Flip and cook another 3–4 minutes on the second side.
- Check with a meat thermometer: aim for about 74°C (165°F) at the thickest point.
- If the outside darkens too quickly, reduce the heat and finish gently.
A quick sear followed by gentler heat keeps the outside golden while the centre reaches a safe temperature without drying.
Oven-baked chicken for hands-off cooking
For a more relaxed option, the oven handles the timing while you work on side dishes.
- Preheat the oven to around 180°C (350°F).
- Place the breasts on a lined tray, lightly oiled, without crowding.
- Brush with oil or melted butter and add seasoning or a spice rub.
- Bake for 15–20 minutes, depending on thickness.
- Baste once or twice with pan juices to keep the surface moist.
Because brined meat retains more moisture, it typically stays tender even if the tray sits a couple of extra minutes-helpful for cooks who worry about undercooking poultry.
Gentle steaming for clean flavours
Steaming suits anyone who wants a lighter plate or plans to slice the chicken for salads, grain bowls, or lunch boxes.
- Place the brined, dried breasts in a steamer basket over simmering water.
- Cover and steam until the internal temperature reaches 74°C (165°F).
- Let the chicken rest before slicing so the juices settle.
This keeps flavours clean and mild, which works well when a bold sauce, salsa, or dressing brings the main punch.
How chefs build even more flavour on brined chicken
Resting time after cooking
Once the chicken comes off the heat, a short rest matters more than most people expect. Hot juices are under pressure inside the meat; cut immediately, and they spill out onto the board.
- Move cooked breasts to a warm plate.
- Tent loosely with foil instead of sealing tightly.
- Wait 5–10 minutes before slicing.
That short resting window lets the juices redistribute, so every slice looks moist instead of leaving a puddle behind.
Marinating after brining
Some restaurant kitchens add a quick marinade after brining. The brine boosts moisture and seasoning inside the meat, while the marinade focuses on surface flavour and texture.
- Use yoghurt or buttermilk with spices for a tender, tangy crust.
- Try olive oil with lemon juice, garlic and herbs for a Mediterranean profile.
- Keep marinades short-often 30–60 minutes-because the meat already carries salt from the brine.
Why brining fits into everyday cooking
Brining used to sound like a weekend project-something for whole turkeys and ambitious roasts. Used in a smaller, quicker way, it fits weeknight cooking just as well. A 30-minute soak while you prep vegetables, set the table, or choose a side dish already makes a noticeable difference.
The technique also extends beyond chicken. Lean pork loin, turkey escalopes, and some firm fish fillets become more resilient over heat after a mild brine. For anyone trying to cook less processed meat and rely more on fresh ingredients, this small step helps keep meals satisfying without heavy sauces or deep frying.
There are a few things to manage: anyone watching sodium intake should account for the added salt, and raw chicken requires careful handling with clean boards and tools. Still, compared with many restaurant-style methods, this one stays relatively low-cost and low-risk.
For cooks building confidence, brining works like quiet “training wheels.” It reduces the penalty for slightly imperfect timing and helps avoid dry, disappointing chicken. As grocery costs shift, turning a basic pack of chicken breasts into several reliable meals-salads, sandwiches, pasta dishes-offers a clear practical advantage at home.


Comentarios
Aún no hay comentarios. ¡Sé el primero!
Dejar un comentario